블로그 이사했습니다!
👇 블로그 이전 공지 👇
👇 새 블로그에서 글 보기 👇
[Android] RecyclerView CRUD — Win Record (tistory.com)
[Android] RecyclerView CRUD
⚠️ 2021.01.07에 작성된 글입니다 ⚠️ CRUD 리사이클러뷰 아이템을 추가, 수정, 삭제할 수 있다. CRUD란 create(생성), read(조회), update(수정), delete(삭제)를 뜻한다. 철자 그대로 '씨알유디'라고 읽거나
win-record.tistory.com
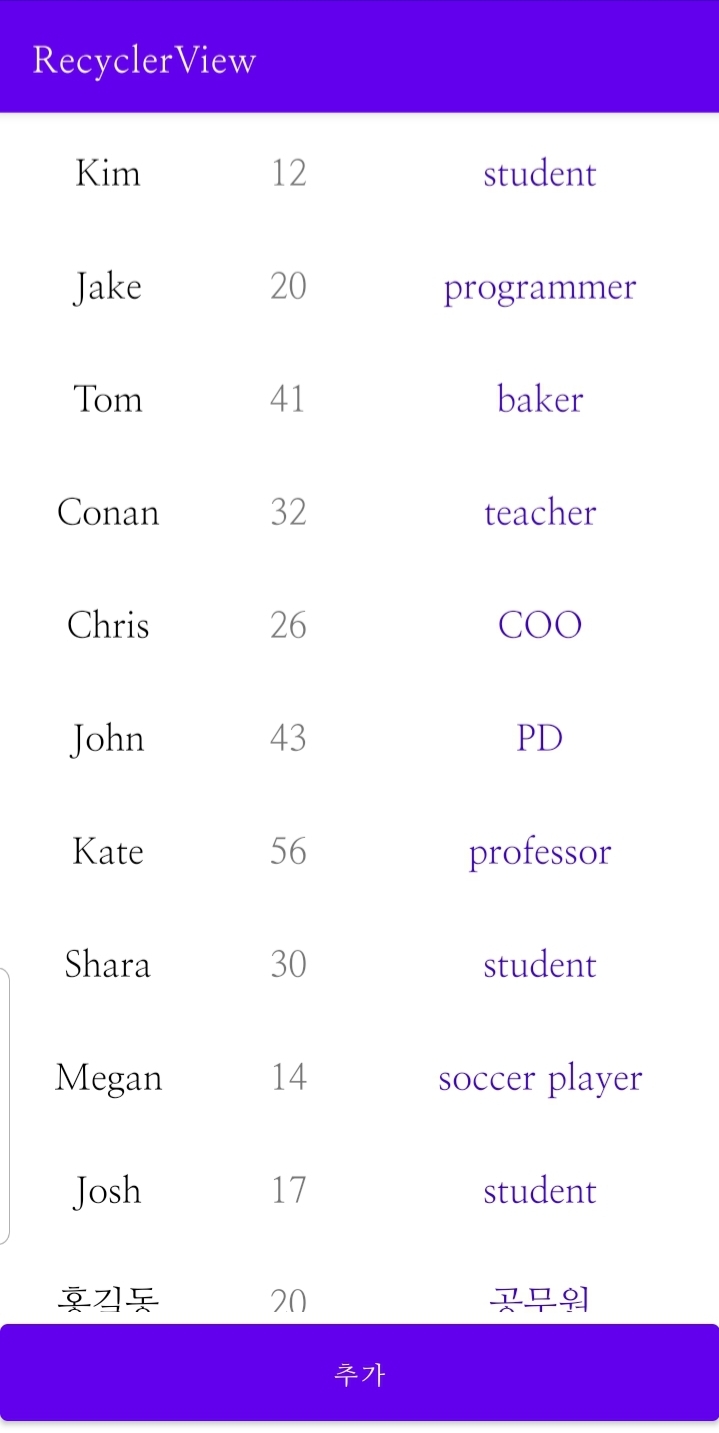
결과 미리보기
추가 액티비티에서 아이템 추가


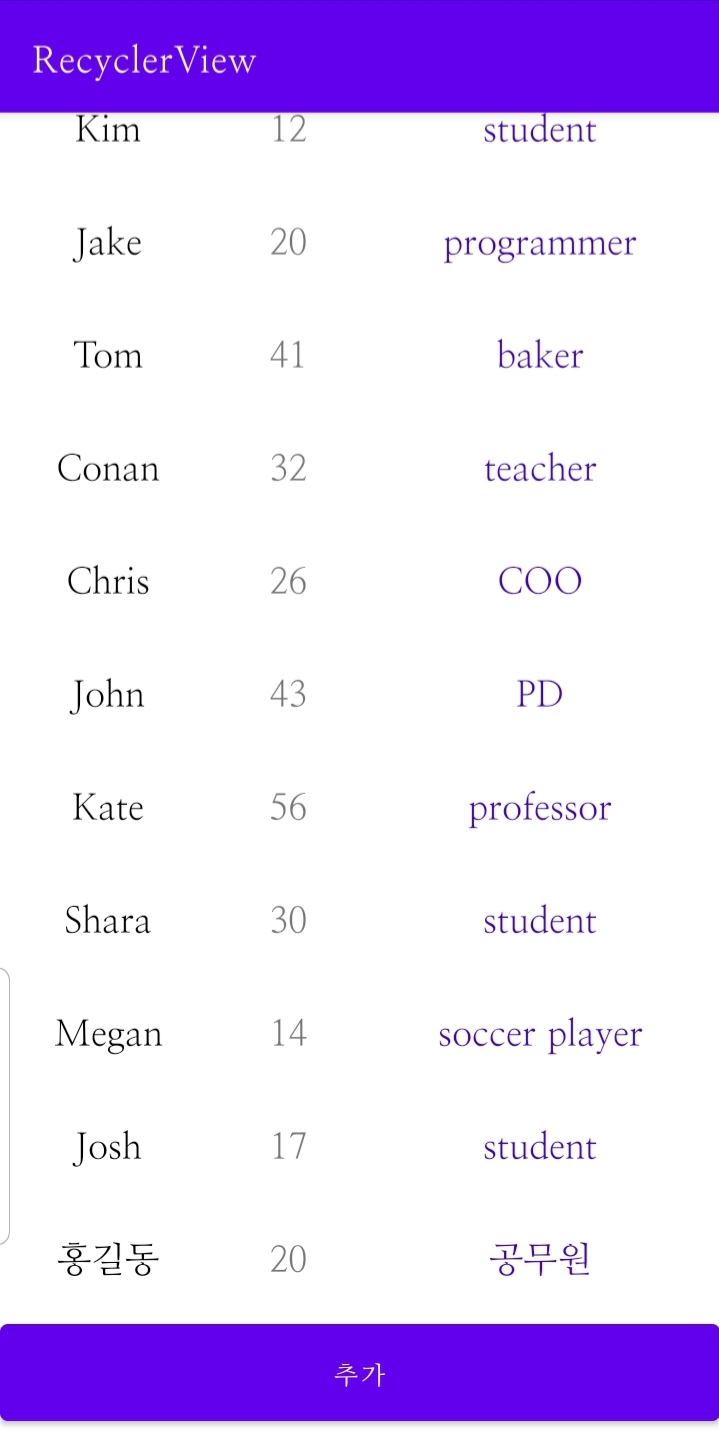
아이템 클릭 시 수정액티비티에서 아이템 수정

아이템 길게 클릭 시 삭제


아이템 추가하기
동작:
추가 버튼을 누르면 추가 액티비티로 이동한다.
추가 액티비티에서 정보 입력 후 확인 버튼을 누르면 메인 액티비티로 이동한다.
1. 버튼 추가하기
<?xml version="1.0" encoding="utf-8"?>
<LinearLayout xmlns:android="http://schemas.android.com/apk/res/android"
    xmlns:tools="http://schemas.android.com/tools"
    android:layout_width="match_parent"
    android:layout_height="match_parent"
    android:orientation="vertical"
    tools:context=".MainActivity">

    <androidx.recyclerview.widget.RecyclerView
        android:id="@+id/recyclerview"
        android:layout_width="match_parent"
        android:layout_height="0dp"
        android:layout_weight="1" />

    <Button
        android:id="@+id/btn_create"
        android:layout_width="match_parent"
        android:layout_height="wrap_content"
        android:paddingTop="15dp"
        android:paddingBottom="15dp"
        android:text="@string/create" />
</LinearLayout>
2. activity_item 생성
<?xml version="1.0" encoding="utf-8"?>
<androidx.constraintlayout.widget.ConstraintLayout xmlns:android="http://schemas.android.com/apk/res/android"
    xmlns:app="http://schemas.android.com/apk/res-auto"
    android:layout_width="match_parent"
    android:layout_height="match_parent">

    <LinearLayout
        android:id="@+id/linearLayout"
        android:layout_width="0dp"
        android:layout_height="wrap_content"
        android:orientation="vertical"
        app:layout_constraintBottom_toTopOf="@+id/btn_submit"
        app:layout_constraintEnd_toEndOf="parent"
        app:layout_constraintStart_toStartOf="parent"
        app:layout_constraintTop_toTopOf="parent"
        app:layout_constraintWidth_percent="0.6">

        <EditText
            android:id="@+id/edt_name"
            android:layout_width="match_parent"
            android:layout_height="wrap_content"
            android:hint="@string/name"
            android:inputType="text"
            android:textColor="@color/black"
            android:textSize="20sp" />

        <EditText
            android:id="@+id/edt_age"
            android:layout_width="match_parent"
            android:layout_height="wrap_content"
            android:hint="@string/age"
            android:inputType="numberDecimal"
            android:maxLength="3"
            android:textSize="20sp" />

        <EditText
            android:id="@+id/edt_job"
            android:layout_width="match_parent"
            android:layout_height="wrap_content"
            android:hint="@string/job"
            android:inputType="text"
            android:textSize="20sp" />
    </LinearLayout>

    <Button
        android:id="@+id/btn_submit"
        android:layout_width="match_parent"
        android:layout_height="0dp"
        android:text="@string/submit"
        app:layout_constraintBottom_toBottomOf="parent"
        app:layout_constraintHeight_percent="0.12" />
</androidx.constraintlayout.widget.ConstraintLayout>
3. AddActivity 생성
public class AddActivity extends AppCompatActivity {
    EditText edtName, edtAge, edtJob;
    Button btnSubmit;
    String name, job;
    int age;

    @Override
    protected void onCreate(@Nullable Bundle savedInstanceState) {
        super.onCreate(savedInstanceState);
        setContentView(R.layout.activity_item);

        edtName = findViewById(R.id.edt_name);
        edtAge = findViewById(R.id.edt_age);
        edtJob = findViewById(R.id.edt_job);

        btnSubmit = findViewById(R.id.btn_submit);
        btnSubmit.setOnClickListener(new View.OnClickListener() {
            @Override
            public void onClick(View view) {
                name = edtName.getText().toString();
                job = edtJob.getText().toString();
                age = Integer.parseInt(edtAge.getText().toString());
                if (name.length() > 0 && job.length() > 0 && age > 0) {
                    Intent intent = new Intent(getApplicationContext(), MainActivity.class);
                    intent.putExtra("new", true);
                    intent.putExtra("name", name);
                    intent.putExtra("age", age);
                    intent.putExtra("job", job);
                    startActivity(intent);
                    finish();
                }
            }
        });
    }
}
4. MainActivity 코드 추가
@Override
protected void onCreate(Bundle savedInstanceState) {
    btnCreate = findViewById(R.id.btn_create);
    btnCreate.setOnClickListener(new View.OnClickListener() {
      @Override
      public void onClick(View view) {
        startActivity(new Intent(getApplicationContext(), AddActivity.class));
      }
    });
}

@Override
    protected void onStart() {
        super.onStart();
        String name, job;
        int age;
        name = getIntent().getStringExtra("name");
        job = getIntent().getStringExtra("job");
        age = getIntent().getIntExtra("age", -1);
        members.add(new Member(name, age, job));
        }
    }
5. Manifest 수정 (SharedPreferences 사용하지 않았기 때문)
<activity
    android:name=".MainActivity"
    android:launchMode="singleTask">
      <intent-filter>
          <action android:name="android.intent.action.MAIN" />

          <category android:name="android.intent.category.LAUNCHER" />
      </intent-filter>
</activity>
MainActivity에 launchMode설정
[결과 화면]
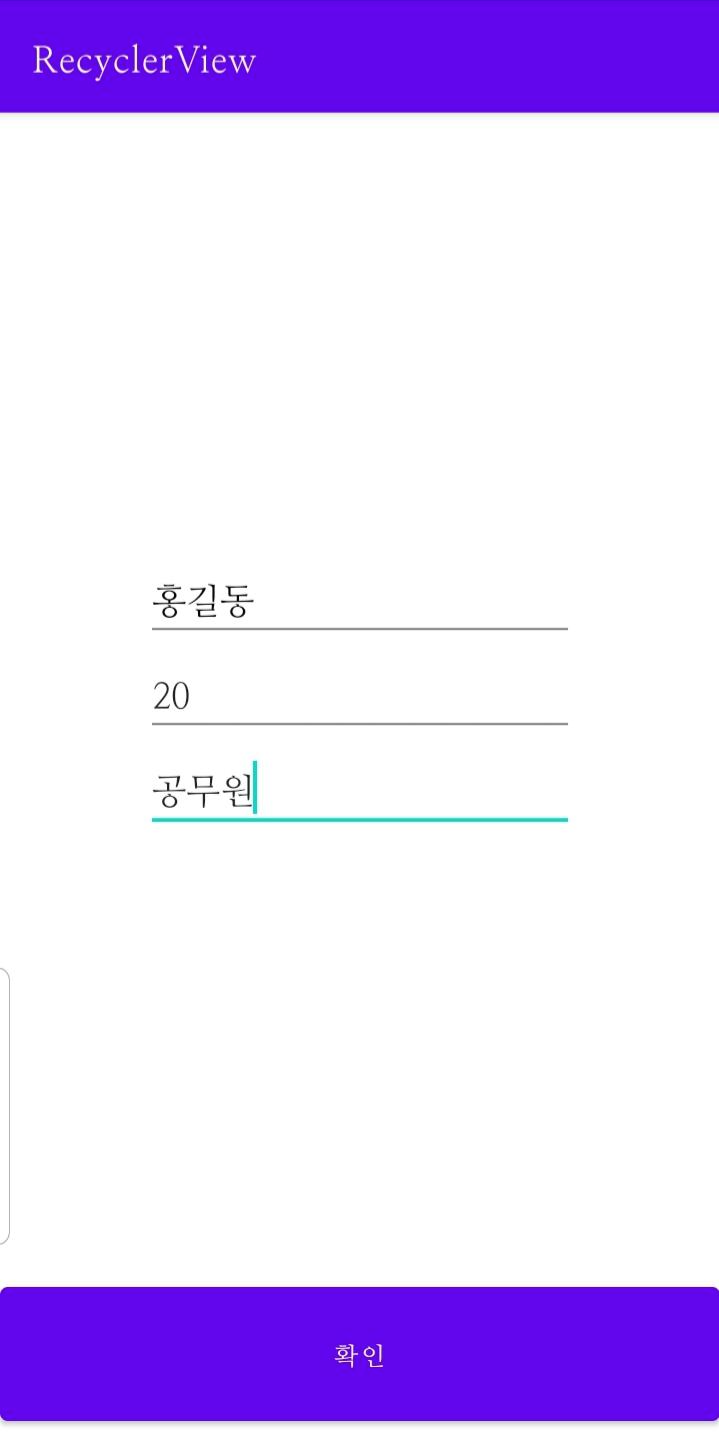
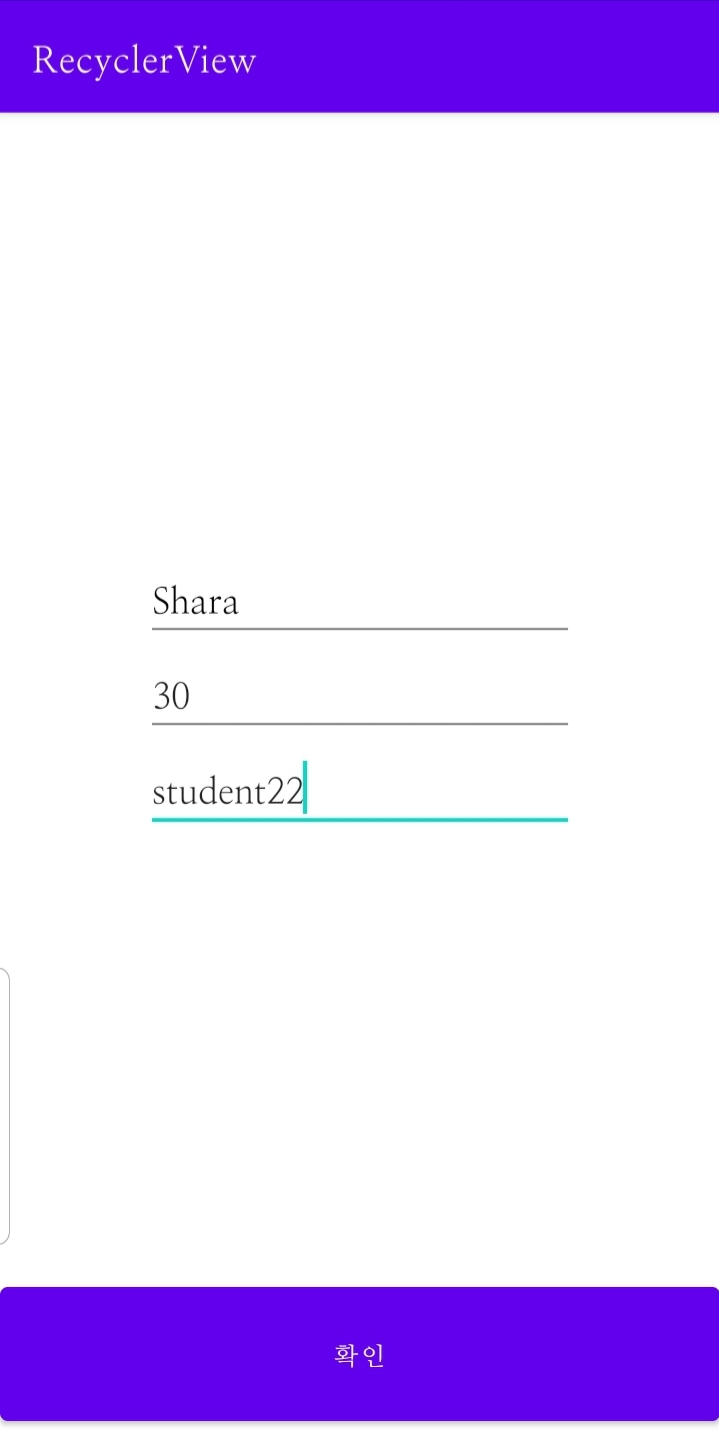
아이템 수정하기
동작:
아이템을 클릭하면 정보를 수정 액티비티로 이동한다.
수정 액티비티에서 정보를 수정하고 확인을 누르면 메인 액티비티로 이동한다.
1. 어댑터에 아이템 클릭 이벤트 추가
public class CustomAdapter extends RecyclerView.Adapter<CustomAdapter.CustomViewHolder> {
    ArrayList<Member> members;
    Context mContext;

    public class CustomViewHolder extends RecyclerView.ViewHolder {
        //        adapter의 viewHolder에 대한 inner class (setContent()와 비슷한 역할)
        //        itemView를 저장하는 custom viewHolder 생성
//        findViewById & 각종 event 작업
        TextView tvName, tvAge, tvJob;

        public CustomViewHolder(@NonNull View itemView) {
            super(itemView);
//            item 에 대한 클릭 이벤트 설정
            tvName = itemView.findViewById(R.id.item_name);
            tvAge = itemView.findViewById(R.id.item_age);
            tvJob = itemView.findViewById(R.id.item_job);

            itemView.setOnClickListener(new View.OnClickListener() {
                @Override
                public void onClick(View view) {
                    int position = getAdapterPosition();
                    if (position != RecyclerView.NO_POSITION) {
                        Intent intent = new Intent(mContext, EditActivity.class);
                        intent.putExtra("name", members.get(position).getName());
                        intent.putExtra("age", members.get(position).getAge());
                        intent.putExtra("job", members.get(position).getJob());
                        intent.putExtra("position", position);

                        mContext.startActivity(intent);
                    }
                }
            });
        }
    }
2. EditActivity 생성
public class EditActivity extends AppCompatActivity {
    EditText edtName, edtAge, edtJob;
    Button btnSubmit;
    String name, job;
    int age;

    @Override
    protected void onCreate(@Nullable Bundle savedInstanceState) {
        super.onCreate(savedInstanceState);
        setContentView(R.layout.activity_item);

        edtName = findViewById(R.id.edt_name);
        edtAge = findViewById(R.id.edt_age);
        edtJob = findViewById(R.id.edt_job);

        name = getIntent().getStringExtra("name");
        job = getIntent().getStringExtra("job");
        age = getIntent().getIntExtra("age", -1);

        edtName.setText(name);
        edtAge.setText(String.valueOf(age));
        edtJob.setText(job);

        btnSubmit = findViewById(R.id.btn_submit);
        btnSubmit.setOnClickListener(new View.OnClickListener() {
            @Override
            public void onClick(View view) {
                name = edtName.getText().toString();
                job = edtJob.getText().toString();
                age = Integer.parseInt(edtAge.getText().toString());
                if (name.length() > 0 && job.length() > 0 && age > 0) {
                    Intent intent = new Intent(getApplicationContext(), MainActivity.class);
                    intent.putExtra("edit", true);
                    intent.putExtra("name", name);
                    intent.putExtra("age", age);
                    intent.putExtra("job", job);
                    intent.putExtra("position", getIntent().getIntExtra("position", -1));
                    startActivity(intent);
                    finish();
                }
            }
        });
    }
}
3. MainActivity 코드 추가
 @Override
 protected void onNewIntent(Intent intent) {
     super.onNewIntent(intent);
     setIntent(intent);
 }

@Override
protected void onStart() {
    super.onStart();
    int action = 0;
    if (getIntent().getBooleanExtra("new", false)) action = 1;
    else if (getIntent().getBooleanExtra("edit", false)) action = 2;
    Log.d(TAG, "onStart: " + action);
    if (action > 0) {
        String name, job;
        int age;
        name = getIntent().getStringExtra("name");
        job = getIntent().getStringExtra("job");
        age = getIntent().getIntExtra("age", -1);
        if (action == 1) members.add(new Member(name, age, job));
        else { // when action == 2
            int position = getIntent().getIntExtra("position", -1);
            if (position != -1) {
                members.get(position).setName(name);
                members.get(position).setAge(age);
                members.get(position).setJob(job);
            }
        }
        adapter.notifyDataSetChanged();
    }
}
[결과 화면]
아이템 삭제하기
동작:
아이템 롱클릭 시 삭제하겠냐는 다이얼로그가 나타난다.
삭제하기를 선택하면 해당 아이템이 삭제된다.
1. 어댑터 롱클릭 이벤트 추가
public class CustomViewHolder extends RecyclerView.ViewHolder {

		...

public CustomViewHolder(@NonNull View itemView) {
    super(itemView);

    ...

    itemView.setOnLongClickListener(new View.OnLongClickListener() {
        @Override
        public boolean onLongClick(View view) {
            int position = getAdapterPosition();
            if (position != RecyclerView.NO_POSITION) {
                AlertDialog.Builder builder = new AlertDialog.Builder(mContext);
                builder.setTitle("삭제하기")
                        .setMessage(members.get(position).getName() + "을(를) 삭제하시겠습니까?")
                        .setPositiveButton("삭제하기", new DialogInterface.OnClickListener() {
                            @Override
                            public void onClick(DialogInterface dialogInterface, int i) {
                                members.remove(position);
                                notifyDataSetChanged();
                            }
                        })
                        .setNeutralButton("취소", null)
                        .show();
                }
                return false;
            }
        });
    }
}
[결과 화면]
전체 코드
이전 글
RecyclerView 기본 사용 (tistory.com)
다음 글
다음 글 예정
참고자료
리사이클러뷰 아이템 클릭 이벤트 처리. (RecyclerView Item Click Event) :: 개발자를 위한 레시피 (tistory.com)
[안드로이드/Android] Dialog 와 AlertDialog 사용하기 (tistory.com)
Dialog 팝업창 종류 및 커스텀 Dialog 팝업창 (tistory.com)
공부하며 정리한 글입니다. 내용에 대한 피드백은 언제나 환영입니다.
'android' 카테고리의 다른 글
| 디데이 계산기 (0) | 2021.01.11 |
|---|---|
| WebView 웹뷰 (0) | 2021.01.10 |
| RecyclerView 기본 사용 (0) | 2021.01.07 |
| RecyclerView란 (0) | 2021.01.06 |
| android jetpack (0) | 2021.01.06 |


댓글